Archive | Photography Tips RSS feed for this section

Backpacking and Photography in the Petrified Forest National Park

13 Jun

Exploring the Painted Desert and Black Forest areas of the Petrified Forest National Park

07197627-rock-crawl---Copy-2

“The Wanderers” Early morning dappled light in a remote area of the Petrified Forest

The Petrified Forest National Park lies along the remote eastern border of Arizona near the small railroad town of Holbrook. Surrounded by the Hopi, Navajo and Zuni Indian Reservations, vast rolling badlands feature copious amounts of petrified wood. A paved road connects two visitor centers. The drive between features various landmarks, overlooks, pueblos, mesas and other Route 66 curiosities.

The park closes at sunset and does not have a campground. The only way to spend the night is by backpacking. Entrance fees are $20 and backcountry permits are free. Of course, bring plenty of water!

Timing your visit to this arid high-desert playground is tricky. Expect 40-degree differences between highs and lows. There are no perfect months for weather. Late spring and early fall are top choices for comfortable days and chilly nights.

The mission of my June 1st visit  to successfully capture the full moon. We choose to enter the backcountry from the unnamed trail near the Painted Desert Inn (historic landmark) in the northern sector. There are no topographic maps available at the visitor center and a GPS is highly recommended.

After setting up camp, I settled upon a rocky perch ringed with various geologic oddities overlooking crimson badlands for the sunset session. Light was harsh and a 400 mm lens would have been useful. Photography was tricky especially finding suitable foreground compositions and capturing adequate depth of field.

07197546-hoodoos-sunset-painted-desert-flat---Copy
“Extraterrestrial Flapjacks”


As the light waned I was almost to busy pursuing my goal of the perfect shot to notice the absence of the full moon. The sky was ninety-percent clear but obviously it was hiding somewhere. I could not even see a source of light! As I packed up my belongings writing off another opportunity to capture one of my favorite subjects…the moon peeked out behind the veil of thick clouds. I worked quickly to capture the scene and to my delight to develop an adequate rendition of my experience.

07197572-moon-fortress-flat-2---Copy

“Lunar Fortress”

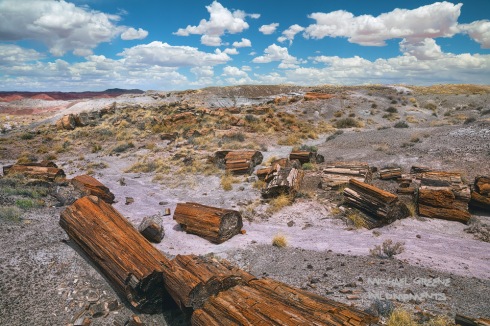
As the night progressed the clouds thickened and when I awoke I knew that it would be a fantastic sunrise.  The color appeared quicker than anticipated as I scrambled up a steep, clay mesa behind our campsite near a wash. While I had not scouted this spot the night before, I was pleased with the unending views as well the abundant petrified logs.

Sunrise-painted-desert-flat---Copy

“Primordial Firewood”

While I expected the sky to clear, a fresh new layer of clouds flew into the scenery. I climbed higher above the badlands for a bird’s eye before settling on a distant location. I predetermined a safe way down and knew that I’d have just enough to time to capture the best light.

07197610-best-morning-light-painted-desert---Copy

“Solitary Awakening”

While the day heated up we ventured out for one last round of sight seeing before returning to our vehicle. The desert smelled of rain and distant storm clouds confirmed our senses. I had difficulty finding the location I had visited earlier but stumbled upon miles of other enticing scenic interests. I’d love to learn about your favorite interpretation of my experiences. Thanks for reading and sharing!

07197718-Petrified-Last---Copy

“Day of the Sky”

07197723-Edit-the-long-wood---Copy

“The Long Wood”

Exploring The Desolation Wilderness

27 Sep

Backpacking The Sierra Nevada in September

I recently returned from a 3-night backpacking trip in the Desolation Wilderness. This adventure offered a cornucopia of surprises including 50-mph wind gusts, heavy rain and snow and campground thieves. It was a heck on adventure!

The serendipitous choice to visit this remote pocket of wilderness near South Tahoe was based on logistics, subject matter, budget, and weather. The 50-mph wind gusts were predicted but not accounted for. I simply did not believe the forecast. And snow was never mentioned…

Untitled1Desolotion-Top-Crop-flat---Copy

“Enchanted Dreams” Off-trail in the Desolation about an hour before the rain

Three of the four days featured stormy, windy, and overcast conditions while a layover day was mostly sunny and breezy. Temperatures never exceeded 65 degrees. The howling winds smashing the side of my tent often affected my sleep. The last night was notably piercing and the open basin sounded like a wind tunnel.

Fortunately the smothering rain changed to snow after sunset and the frozen sides of my tent helped weigh it down. If it hadn’t snowed my tent would have surely flooded. The next morning was gorgeous until 9:45 am when the weather soured. By 11:15 am I experienced blizzard-like conditions ascending 8500-foot Maggie’s Peak en route to the Bayview Trailhead.

Overall, the wilderness was gorgeous with shimmering water and shining slabs of granite. Most peaks here top out just south of 10,000 feet so there isn’t as much vertical relief for photography. We saw only 5 people over the last 3 days and I was elated with the level of solitude! Obviously, the weather had something to do with that.

I’ll have a few more pictures on my website soon. Enclosed are a couple of cell phone shots. If you want to learn more about this trip, hit me up and I’ll pen a follow-up!

Pond-Cell-Phone

A remote lake in the Desolation Wilderness

Cell-phone-view-from-camp

A view near base camp.

Arizona’s Top 3 National Monuments Part 2

7 Jul

125030461_orig

Arizona is brimming with enchanting places to explore including over a dozen national monuments. This is the second of a three part series on my favorites, including the pros and cons, best times to visit, and other key travel tips.

Organ Pipe Cactus National Monument

A long, winding dirt road pierces the desert floor leading toward a crest of crimson cliffs. While speckles of jubilant yellow dot the hillsides, this is a foreboding place. Chiseled by arroyos and protected by chollas, views fan out beyond the unseen international border. Despite the crusty terrain, the ride is smooth and the warm, dry air is surprisingly fresh.

By mile four, undulating gardens of distinctive cacti animate the landscape. In the fading light of day, these haunting figurines mimic the human form. Normally, the patriarchal saguaro rules the Sonoran but in this lonely pocket of country features a rival. The banana-shaped organ pipe cactus is not as tall as the saguaro but much wider. While common in Mexico, organ pipe are only found in this US park, which is also a UNESCO biosphere reserve.

jurassic-park

At nearly 331,000 acres Organ Pipe Cactus NM is the largest national monument in AZ with 95% of the land designated wilderness. Park visitors can explore via two scenic loop drives. The Ajo Mountain drive is the most popular and scenic. It is a 21-mile, one-way loop that traces the base of the mountains before circling back toward the visitor center. Across the highway is the Puerto Blanco Loop, a 37-mile drive through mostly open desert and gaping views. Other rough 4WD roads are options for longer stays and seasoned visitors.

The park has several official hiking trails but the premier trek is summiting 4808-foot Mount Ajo, the areas highest peak.  This is a full-day hike, partially off-trail totaling 9 miles with a cumulative elevation gain of 2800 feet. Definitely not for beginners. A shorter and easier option is hiking the trail from the campground to the visitor center. Enjoy pleasant views of the mountains while traversing through copious cholla gardens. There are a few benches along the way.

empire-2

The exceptional Twin Peaks Campground, featuring 360-degree views, was fully remodeled less than ten years ago. There is reliable vacancy nearly year round. If interested in hotels, find a few in the town of Ajo about 35 miles away.

Summers at Organ Pipe Cactus NM are hot. The ideal times to visit are between November and early April with pleasant daytime highs and cool nights. Delicate ground flowers such as poppies and owl clover flourish in late February and early March. The strength of annual blooms vary and flowers wither when daytime highs exceed 85 degrees. Saguaros and organ pipe cacti don’t bloom until May.

Dining choices are also limited. There is a convenience store and small diner in Lukeville, a military-border town about seven miles away. Purchase a few snacks and cold water at the visitor center, otherwise, it’s a lengthy drive to a restaurant.

cloudy-day

If you are interested in seeing the best of Organ Pipe Cactus NM consider joining me on a group workshop. Due to high springtime demand of my private tours,  I’m assembling a 3-day group event in March of 2018. If interested, message me for more information.


Arizona’s Top 3 National Monuments Part 1

26 Jun

125030461_orig

Arizona is brimming with enchanting places to explore including over a dozen national monuments. This is the first installment of a three part series on my favorites, including the pros and cons, best times to visit, and other key travel tips.

Canyon De Chelly National Monument

IMG_2719-as-Smart-Object-1-Canyon-de-Chelley-Flat-copy

A gaping chasm of sandstone reveals a lush valley with zigzagging patterns of stately cottonwood trees. Hidden in this oasis are myriads of ancient ruins, linking the past to present. My strongest impression is indulging in the palpable silence of sunrise while standing on the precipice of a sheer 1,000-foot cliff. A whispering breeze slices through the stillness of this lonesome landscape. Carefully navigating the rocks only inches from certain death invigorates my soul. Occasionally I hear from a companion, a cawing raven struggling in the cross currents.

Canyon De Chelly is the premier national monument in Arizona and a top-shelf scenic attraction. Established in 1931, the Navajo Nation owns this national historic treasure. A series of roads surround it connecting unique vistas with interesting names and stories. Getting around may confuse first-time visitors as Canyon De Chelly actually comprises four canyons and features complex geology.

Many viewpoints feature wide, sprawling platforms perfect for scrambles and exploring. It is easy to find solitude among the many nooks, overhangs, and ledges. However, there is only one public trail in the park. A 1.2-mile route (Whitehouse Ruins Trail) leads down a winding rock passage from an overlook to the valley floor. Further exploring is prohibited without a Navajo guide. (Easily book a private or public sightseeing tour near the visitor center. Prices are negotiable.)

The most iconic landmark is Spider Rock, a lone, towering spire in a secluded basin that shimmers at sunset. A brief 10-minute walk introduces the best views but some sight lines are obscured by dense foliage and dangerous outcroppings. Local residents (a.k.a.) outgoing canyon dogs sometimes tag along for fun. The Spider Rock Overlook is about a half-hour drive (16 miles) from the visitor center and campground.


122337261.4nLwaDyc.CanyondeChelley8

Photo by Dean Hueber see more of his work here


In addition to the campground, other lodging options include an in-park hotel and several others in nearby Chinle, a town of about 5,000 people. The privately owned Spider Rock Campground adds the unique experience of staying in a Navajo hogan. A three-day stay is a perfect introduction to this spellbinding place. Canyon De Chelly is a true four-season park with fall colors usually occurring toward the end of October. It is a five-hour drive from Phoenix or about fours from Albuquerque, NM.


Photographing Ice Lake

16 Jun

In addition to hiking, my book also includes a photography section for each lake. This provides useful information for both the serious shooter and the casual looking to improve his or her (smartphone) shots. While each chapter is unique, topics include instructional, technical and creative advice. Also discussed are nearby points of interest, strategies for finding the best composition and more.

You might learn something that isn’t obvious too. For instance, notice the distance from the water in the picture below. It’s about a half mile and 500 feet of elevation away. In many spacious basins, it is challenging to explore everywhere in one visit. That’s why tips on where to go help.

Below is partial excerpt for a popular location in the San Juan Mountains. July and August are the perfect times to visit. For an amazing experience, consider personal instruction and guidance by yours truly this year! Find more information about this here.

Exertion Point

Ice Lake Basin, Colorado, August

Capturing or witnessing Upper Ice Lake Basin’s signature alpenglow is an exclusive experience available to those willing to spend the night. Golden Horn is the most iconic peak and befittingly shows off the best display of crimson morning light, both before and immediately after sunrise.

During times of peak wildflowers, compositions are plentiful. The most iconic shots feature alpenglow reflections and successful ones accentuate form. Consider shooting at an intimate tarn as opposed to Upper Ice Lake. Sunrise images won’t display the lake’s vivid color, which needs direct midmorning light. Be sure to bracket shots or use a graduated neutral-density filter.

Another alternative is shooting Ice Lake’s hefty outlet stream. Several sections of rippling cascades offer excellent vantage points. These dynamic compositions usually do not include the lake. Use a wide-angle lens and try blending for depth of field.

Perhaps skip the water altogether and fill your foreground with a bouquet of splashy wildflowers. This works best on still mornings and emphasizes spectacle. Whatever you choose, the best plan is staying more than one night to ensure the greatest opportunity for success.

Sunrise is not the only time for mesmerizing photography. Midmornings on partly cloudy days also yield outstanding results. Remember to use a polarizer and shoot when the groundcover is in partial shadow. Even in harsh midday light, the lake photographs well with a smartphone.

_MG_2810-moonset-Ice-Lake-stream-flat

Continue reading

Hiking Hope Lake

10 Jun

IMG_4211-HDR-Edit-Hope-Lake-Flat

Below is an excerpt from my new book, Capturing Colorado: Hiking & Photographing Lakes of the San Juan Mountains. Celebrate summer with a definitive guide to Colorado’s finest range. Find out more about this exciting guide here.

Clouds play hide-and-seek amid unearthly red peaks and motley fields of flowers en route to Hope Lake. The price to pay for this special occasion is a paltry one – 2.5 miles and 1500 feet of altitude gain. A relative drop in the bucket compared with the taxing work necessary to reach other locations with similar scenery. Hiking is part of the allure, making this adventure an ideal choice when exploring near Rico and Telluride.
Begin on level dirt venturing through a shaded forest before reaching a hillside gulley. The streambed is wide and shallow but floods after heavy rains. An unobstructed presentation of a looming crest soon appears. Accentuated by the chattering sounds of water, these stately sights impress.
Effortless hiking continues for over a mile, including a brief downhill stint on a series of meandering switchbacks. Views progressively improve with shimmering Trout Lake and the unorthodox skyline of the Lizard Head Wilderness afar. Twenty-five minutes of walking brings the confluence of two major waterfalls and the trail traces them upwards. A wooden sign marks the beginning of this climb, which is a natural resting spot. Nearby, a tree-covered ravine makes an enchanting place to investigate.
The final push takes place on moderate switchbacks through a timber canopy and open understory. An occasional window offers compelling views of an imposing peak. Walk on soft ground while enjoying the roaring sounds of water splashing down the mountain.
Above the trees, enter a medium-sized meadow with unbelievable vantages of the burnt-orange slopes of 13,897-foot Vermillion Peak. Enjoy outstanding views of this mysterious mountain amid dizzying scenery. Wandering forward toward a notch in the hills, catch your first glimpse of soothing Hope Lake. You may find yourself wondering, “Is this place real?”

Backpacking and Hiking Tips Vol. 1 – Fitness

24 Jun

Book-Cover1FLAT---Copy
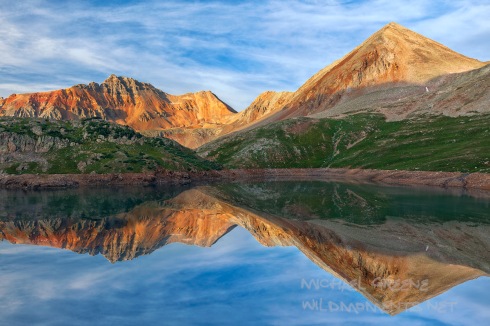
Summertime in Colorado means hiking and backpacking in the mountains. This post is the first installment of ways to help maximize your outdoor adventures and excursions this summer. Today we’ll talk about training.

Physical preparation is a key component to a fulfilling hiking or backpacking trip, especially if you have a big outing planned.

It is important to start 6 to 10 weeks in advance depending on your fitness level. Let’s dive into some specifics…

Training Regimens

Out-of-shape – Try a 10-week training program. Start with 30 minutes of moderate cardiovascular activity 3 – 4 times a week for the first couple of weeks. Over the next month, gradually increase the level of difficulty of your training as well as the length of your sessions up to 45 minutes. A month before your trip, begin the most intense portions of exercise and training. Increase frequency to 5 times a week and length of cardiovascular activity up to an hour each session. Intensity should be higher meaning you should cover more distance at a higher resistance level in the same amount of time or less.

Perform some additional leg exercises such as ball squats and lunges (reverse) (neither exercise requires holding weights.) once a week over the last 3 weeks. Try high repetitions of 20 for two sets. Maintain this physical regimen until one week before your trip. From that point forward, workout according to how your body feels. I recommend up to two moderate workouts in last week with no cardiovascular activity occurring less than three days before your trip (including travel days.)

Average fitness level – This is for someone who takes care of his/herself, but isn’t a fitness fanatic. The same general training strategy (as above) is recommended with a few modifications. Instead of 10-week regimen try 8 weeks by skipping the first two weeks of suggestions. Make sure you exert yourself to fatigue each workout, but pay attention to your body and take the needed rest. Implement the ball squats and lunges 4 to 6 weeks out and perform them up to twice a week. Two to three sets at high repetitions. If you must hold weights (not recommended) then try not using more than 10-pound dumbbells for these exercises.

Great shape – Try mixing up your cardiovascular workouts as much as possible. If you are a runner – use a treadmill to increase incline or try running hills. The stair master is also a great machine for training. Consider wearing your backpack or daypack and load it down with weight.   Ramp up the intensity as much as possible and increase resistance too. Take the last week off or limit cardiovascular exercise to moderate.

20150818_172342---CopyGeneral Fitness Tips:

  • Develop a stretching routine. Make sure you regularly stretch your quads, hamstrings, calves, and hips. Use static contractions. Do not stretch without warming up first.
  •  Shoulder shrugs are the best upper body training exercise for backpacking. Using dumbbells is the standard method, although a plate-loaded straight bar allows for more versatility. Because your shoulders bear about 20 – 25 % of your pack weight -increasing the strength and size of your trapezoids is a great way prevent fatigue and soreness.
  • Try training in a gym or fitness center. I stopped hiking for training years ago. Living in the desert its simply too hard on my knees, the air quality sucks, and the chance of injury is far greater than using standardized machinery.
  • Make sure you get your backpack properly fitted before using it on your adventure. IF you live in a city REI does this for free, even if you did not purchase the backpack from them.
  • Reserve your first day/night to acclimating to altitude if hiking at over 8,000 feet.

Please note: Although exercise improves your health, a medical checkup before you start an exercise program can help ensure a safe beginning.

I hope these tips help. Let me know what you think or if you have any others to add. Happy hiking and safe travels!!

New Book Coming Soon

8 Oct

I’m currently in the process of working on a new book entitled, “Exploring and Photographing SW Colorado’s High Alpine Lakes.” Initially it will be available as an ebook and I also plan on publishing a print version as well. This book will focus on the San Juan Mountains with detailed driving, hiking, and photography instructions including what times to shoot for the best light as well as other tidbits of useful information. Detailed ratings of each location as well as descriptions of unpaved forest roads and recommended trip lengths will also be included. It should be completed by early next year.

Before the holiday season I’ll be offering a pre-order opportunity where the book will be available at 30% off the initial price. This is a excellent purchase for anyone interested in exploring the San Juans on foot or car with an emphasis on photography. It is sure to help improve your photographs and save you a lot time and effort in trip planning and decision making not to mention help you choose which roads are suitable for your vehicle and driving style without having to actually find out first hand!

Please look for the link in the future as I’ll have much more on this in the next month. I’m happy to answer any questions that you might have. Happy Shooting!!

Wild Moments Blog Has Moved!

22 Mar

Hi Everyone,

This should be my last blog post on this platform. I’ve switched over to wordpress.org, which gives me a lot more freedom to expand and design my blog. My new url is http://landscape-photography-blog.comImagePlease check it out and go there for all future blog posts. If anyone is thinking of switching over to a wordpress.org platform – please don’t hesitate to contact me if you have questions as it is much easier said than done. I hope to see you over at my new blog. I’d love to hear about any feedback you might have as well!

Photoshop Processing Techniques for Improving Your Prints Part 1: Chromatic Aberration

4 Feb

Chromatic aberration is one of those naturally occurring, technical imperfections of your camera lens that can take your favorite photograph and moderately reduce its overall quality if not handled properly. What is chromatic aberration? Well, you may or may not be familiar with the term although if you’ve looked at enough photographs I guarantee that you’ve seen it before, even if you didn’t notice it. Wikipedia defines it this way…

“Chromatic aberration manifests itself as “fringes” of color along boundaries that separate dark and bright parts of the image, because each color in the optical spectrum cannot be focused at a single common point. Since the focal length f of a lens is dependent on the refractive index n, different wavelengths of light will be focused on different positions.” (http://en.wikipedia.org/wiki/Chromatic_aberration)

OK that’s pretty technical. Without getting too convoluted, I define chromatic aberration as color fringing that usually occurs around objects as magenta, blue, red or green outlines or highlights. Chromatic aberration basically occurs from a combination of light, subject matter, aperture selection, and lens quality. It is mostly noticeable in the background of images along horizons and is especially noticeable in mountain scenes captured during the daytime where minor patches of snow are evident.  In some photographs, a small amount of chromatic aberration is acceptable and is usually an easy fix in Adobe Camera Raw or in Photoshop with just the click of a button or the movement of a slider.

Where fixing this problem gets tricky is if there is quite a bit of chromatic aberration that appears in different colors or if you are a perfectionist like I am. Before we get ahead of ourselves let’s quickly discuss how Photoshop or ACR fixes this problem. From how I understand it, what the software actually does is it picks up your image and moves it slightly so that it covers the areas of fringing. However, this isn’t a local selection – it is actually a ubiquitously occurring process in that it moves the entire picture so all areas of your image are affected. The problem with this is that it affects the overall image quality because there is a minor loss of resolution every time this movement is performed. Secondly, the image shift depends on the color so fixing a magenta color fringe won’t necessarily rectify a red one and vice versa. In that particular case, using the software results in a compromise where the color fringing effects can be offset and reduced, but not completely fixed.

Let’s look at an example at how I circumvented both of these issues.  Do you notice the bluish-green fringing around the flowers in the before image below?

Before

Before

After

After

What you are looking at is a small portion of an image that was commissioned by a local bank in Colorado to use for the front of their 2013 calendar. Because the image was being used at approximately 8.5 x 11 for mass distribution I wanted to make it look as good as possible. This was a small fix and it can be a little time consuming. However, if delivering the highest quality product to your clients is must for you (like it is for me) then it is worth the time.  I find the easiest way to fix this problem is with the color replacement tool in Photoshop. In this case, I simply use the color of the flower petals or a neutral grey and trace away the noticeable effects of the chromatic aberration with the color replacement tool. The most important aspect of this method unlike other quick fixes is that it does not sacrifice image quality or resolution. Conversely, it actually makes your image higher quality! I hope you found this post helpful I’d love to read your comments or questions regarding it! My goal is to follow up this post with another blog about Photoshop techniques in the near future.